Spring boot 에서 Fire base storage 연동 하여 사용하기
Firebase 에 접속하여 Stroage 만들기

storage 를 생성 한뒤 private key 가 담긴 json 파일을 다운 받으러 갑니다.

project settings 를 클릭 한뒤
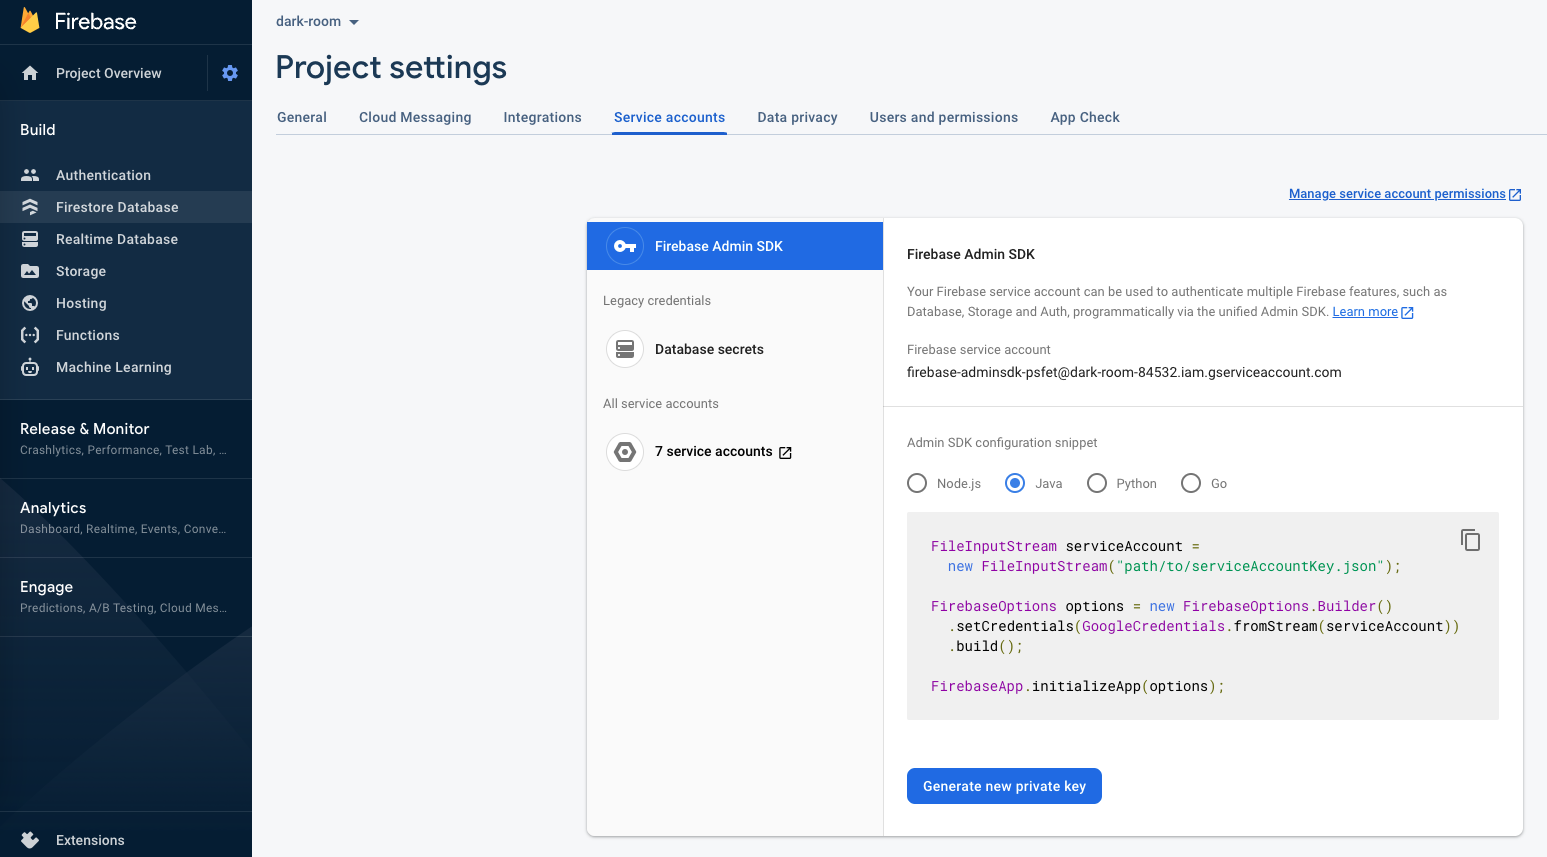
generate new private key 를 누르셔서 잘 보관 해주세요
그런 다음 하나더 필요한 것은 방금 만든 storage 서버 의 bucket name 이 필요합니다.

버킷 네임은 파란색 업로드 파일 버튼 왼쪽에 보이는 링크 입니다.
gs://dark-room-84532.appspot.com
java 에 bucket name 을 입력 할땐 gs:// 을 뺀 그 뒤에 문자열을 입력 하면 됩니다.

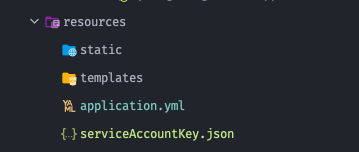
application.yml 에 다음과 같이 추가한뒤 아까 다운받은 json 파일을 application.yml 과 같은 경로에 다음과 같은 serviceAccounKey.json 이라는 이름의 파일로 저장 합니다.
Java 에 FireBase 설정하기
먼저 gradle 및 maven 에 firebase admin sdk dependency 를 추가 해줘야 합니다.
implementation group: 'com.google.firebase', name: 'firebase-admin', version: '8.1.0'
버전은 해당 프로젝트에 맞게 설정 해주세요
import com.google.auth.oauth2.GoogleCredentials;
import com.google.firebase.FirebaseApp;
import com.google.firebase.FirebaseOptions;
import java.io.IOException;
import javax.annotation.PostConstruct;
import lombok.extern.slf4j.Slf4j;
import org.springframework.beans.factory.annotation.Value;
import org.springframework.core.io.ClassPathResource;
import org.springframework.stereotype.Service;

@Slf4j
@Service
public class FireBaseInitializer {

    @Value("${app.firebase-configuration-file}")
    private String firebaseConfigPath;

    @PostConstruct
    public void initialize() {
        try {
            FirebaseOptions options = new FirebaseOptions.Builder().setCredentials(
                GoogleCredentials.fromStream(
                    new ClassPathResource(firebaseConfigPath).getInputStream())).build();
            if (FirebaseApp.getApps().isEmpty()) {
                FirebaseApp.initializeApp(options);
                log.info("Firebase application has been initialized");
            }
        } catch (IOException e) {
            log.error(e.getMessage());
        }

    }
}
initializer 클래스를 만들어주고 PostConstruct 를 사용해 빈에 등록된뒤 한번만 초기화 하도록 설정 합니다.
그런 다음 파일을 업로드 할수 있는 서비스 를 만들어 줍니다.
service/FireBaseService.java
import java.io.ByteArrayInputStream;
import java.io.IOException;
import java.io.InputStream;
import org.springframework.beans.factory.annotation.Value;
import org.springframework.stereotype.Service;
import org.springframework.web.multipart.MultipartFile;

import com.google.cloud.storage.Blob;
import com.google.cloud.storage.Bucket;
import com.google.firebase.auth.FirebaseAuthException;
import com.google.firebase.cloud.StorageClient;

@Service
public class FireBaseService {

    @Value("${app.firebase-bucket}")
    private String firebaseBucket;

    public String uploadFiles(MultipartFile file, String nameFile)
        throws IOException, FirebaseAuthException {
        Bucket bucket = StorageClient.getInstance().bucket(firebaseBucket);
        InputStream content = new ByteArrayInputStream(file.getBytes());
        Blob blob = bucket.create(nameFile.toString(), content, file.getContentType());
        return blob.getMediaLink();
    }
}
마지막으로 테스트 할수 있는 컨트롤러를 만들어 주겠습니다.
@PostMapping("/files")
public String uploadFile(@RequestParam("file") MultipartFile file, String nameFile)
    throws IOException, FirebaseAuthException {
    if (file.isEmpty()) {
        return "is empty";
    }
    return fireBaseService.uploadFiles(file, nameFile);
}
파이어 베이스 는 javascript 에 대한 자료는 풍부했지만 java 로 정보를 찾는데 조금 애를 먹었습니다.
이 글을 보고 도움이 되셨으면 좋겠네요
'Java > java - spring' 카테고리의 다른 글
| Failed to start bean 'documentationPluginsBootstrapper' 오류 해결 (0) | 2022.03.02 |
|---|---|
| JPA 성능 최적화 - N + 1 문제 해결 하기 (0) | 2022.01.30 |
| Aop 를 활용하여 binding result 처리 공통화 하기 (0) | 2022.01.24 |
| Spring Bean 주입하기 (0) | 2021.12.08 |
| Spring - Application Context 와 @Bean (0) | 2021.07.16 |